
Hook是React 16.8的新特性,它可以让在不编写class类组件的情况下使用state以及其他的React特性;而Context是React16.3版本里面引入新的Context API,在以往React版本中存在一个Context API,那是一个幕后试验性功能,官方提议避免使用,Redux的原理就是建立在旧的Context API。现在新的Context ApI提供了一个无需为每层组件手动添加 props,就能在组件树间进行数据传递的方法,为数据通讯另辟蹊径。
Context简介
为解决多层嵌套不同层级组件之间props数据传递,这种数据传递及其繁杂,而且后期不易进行维护,为避免driling式数据通讯,可以采用redux进行数据通讯。在新版本React 16.8.6中Context为我们带来新的通讯方式。
Context API组成部分
React.createContext函数:创建context上下文,参数是一个默认值(需要传递state数据),state可以是Object、Array或者基本类型数据。Provider:由React.createContext创建返回对象的属性。在Redux vs. The React Context API中比喻成构建组件树中的电子总线比较形象。Consumer:由React.createContext创建返回对象的属性。比喻接入电子总线获取数据。
Context vs redux
Context的context.Provider/Context.Consumer和redux的provider/connect非常相似。Context采用的是生产者消费者的模式,我们可以利用高阶函数(Hoc)模拟实现一个redux。
redux是通过dispatch一个action去修改store数据;在React 16.8.6版本的React hooks提供的useredcuers和useContext为我们更方便通过Context+hooks的形式去打造一个属于自己redux
Context 简单例子
Context设计目的是为了共享那些对于一个组件树而言是“全局”的数据,例如当前认证的用户、主题或首选语言。
Class.contextType
挂载在class上的 contextType 属性会被重赋值为一个由 React.createContext() 创建的 Context 对象。这能让你使用 this.context 来消费最近 Context 上的那个值。你可以在任何生命周期中访问到它,包括render 函数中。
Context.Consumer
让你在函数式组件中完成订阅 context。这需要函数作为子元素(function as a child)这种做法。这个函数接收当前的 context 值,返回一个 React节点。传递给函数的value值等同于往上组件树离这个 context最近的Provider 提供的 value 值。如果没有对应的 Provider,value 参数等同于传递给createContext()的 defaultValue。
// Context 可以让我们无须明确地传遍每一个组件,就能将值深入传递进组件树。 // 为当前的 theme 创建一个 context(“light”为默认值)。 const ThemeContext = React.createContext('light'); class App extends React.Component { render() { // 使用一个 Provider 来将当前的 theme 传递给以下的组件树。 // 无论多深,任何组件都能读取这个值。 // 在这个例子中,我们将 “dark” 作为当前的值传递下去。 return ( <ThemeContext.Provider value="dark"> <Toolbar /> </ThemeContext.Provider> ); } } // 中间的组件再也不必指明往下传递 theme 了。 function Toolbar(props) { return ( <div> <ThemedButton /> </div> ); } class ThemedButton extends React.Component { // 指定 contextType 读取当前的 theme context。 // React 会往上找到最近的 theme Provider,然后使用它的值。 // 在这个例子中,当前的 theme 值为 “dark”。 static contextType = ThemeContext; render() { return <Button theme={this.context} />; } } // 也可以按照这种形式获取 function ThemedButton(){ return ( <ThemeContext.Counsumer> {theme =>( <Button theme={theme} /> ) } </ThemeContext.Counsumer> ); } context的详细用法可以参考 Context文档
React Hooks
React Hooks是React 16.8.6版本为函数式组件添加了在各生命周期中获取state和props的通道。可让您在不编写类的情况下使用 state(状态) 和其他 React 功能。不再需要写class组件,你的所有组件都将是Function。如果想了解更多关于React hooks信息可以参考Hooks API 参考。
基础钩子API
useState:获取组件state状态数据,第一个参数是保存的数据,第二参数是操作数据的方法,类似于setState。可用ES6的数组解构赋值来进行获取。useEffect: 网络请求、订阅某个模块、DOM操作都是副作用,useEffect是专门用来处理副作用的。在class类组件中,componentDidMount和componentDidUpdate生命周期函数是用来处理副作用的。useContext:useContext可以很方便去订阅context的改变,并在合适的时候重渲染组件。例如上面的函数式组件中,通过Consumer的形式获取Context的数据,有了useContext可以改写成下面:
function ThemedButton(){ const value = useContext(ThemeContxet); return ( <Button theme={value} /> ); } useReducers API
如果习惯了redux通过reducer改变state或者props的形式,应该比较很好上手useReducers,useReducers和useContext是这篇文章比较重点的API。
useReducers:useReducers可以传入三个参数,第一个是自定义reducer,第二参数是初始化默认值,第三个参数是一个函数,接受第二个参数进行计算获取默认值(可选)。
const [state,dispatch] = useReducer(reducer,initialValue) 下面是useReducers官方示例:
const initialState = {count: 0}; function reducer(state, action) { switch (action.type) { case 'reset': return initialState; case 'increment': return {count: state.count + 1}; case 'decrement': return {count: state.count - 1}; default: // A reducer must always return a valid state. // Alternatively you can throw an error if an invalid action is dispatched. return state; } } function Counter({initialCount}) { const [state, dispatch] = useReducer(reducer, {count: initialCount}); return ( <> Count: {state.count} <button onClick={() => dispatch({type: 'reset'})}> Reset </button> <button onClick={() => dispatch({type: 'increment'})}>+</button> <button onClick={() => dispatch({type: 'decrement'})}>-</button> </> ); } 简易版Redux
redux具有Provider组件,通过store进行传值。在这里,我们使用Context模拟实现Provider和store传值,完整代码可以参考 simple-redux。
封装Provider组件
代码中的storeContext是React.createContext()函数创建的Context对象。this.props.store是模拟通过store传值操作。
import React,{Component} from 'react'; import {storeContext} from './store'; export default class Provider extends Component{ render(){ return ( <storeContext.Provider value={this.props.store}> {this.props.children} </storeContext.Provider> ) } } store数据管理
store文件,包括reducer、Context的创建,initialState与reducers的定义。
import React from 'react'; export const storeContext = React.createContext(); export const initialState = { user:'kiwis', age:23 } export const reducer = (state, action)=>{ switch (action.type) { case 'CHANGENAME': return {user:'harhao',age:24} default: return initialState; } } App.js入口
在根组件App.js中,使用React hooksd的useReducer钩子函数,返回更改state的dispatch函数。然后把store数据和dispatch传递进封装的Provider组件中。
import React,{useReducer} from 'react'; import Provider from './views/Provider'; import Child from './views/child'; import {initialState as store,reducer} from './views/store'; import './App.css'; function App() { const [state,dispatch] = useReducer(reducer,store); return ( <div className="App"> <Provider store={{state,dispatch}}> <Child/> </Provider> </div> ); } export default App; useConnect自定义Hook
在useConext外包裹一层函数,更好模拟connect语法。这里采用自定义React hooks的方法。定义一个自定hook函数useConnect,如下所示:
import {useConext} from 'react'; export default function useConnect(props){ return useContext(props); } Child子组件
在App.js的子组件Child中,在redux中通过connect高阶函数来传递数据。这里可以使用自定义React hooks函数useConnect获取state和dispatch。
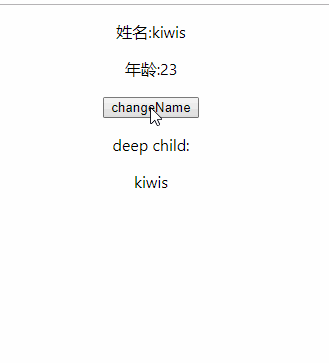
import React,{useContext} from 'react'; import useConnect from './connect'; import {storeContext} from './store'; import DeepChild from './deepChild'; function Child() { const {state,dispatch}= useConnect(storeContext); return ( <div className="child"> <p>姓名:{state.user}</p> <p>年龄:{state.age}</p> <button onClick={()=>dispatch({type:'CHANGENAME'})}>changeName</button> <p>deep child:</p> <DeepChild/> </div> ); } export default Child; DeepChild(孙组件)
在Child子组件中,引入DeepChild组件。通过useContext获取顶层最近的state数据。
import React,{useContext} from 'react'; import {storeContext} from './store'; import useConnect from './connect'; export default function DeepChild(){ const {state} = useConnect(storeContext); return ( <div> {state.user} </div> ) } 运行效果
child子组件和DeepChild孙组件通过useConnect获取顶层数据,最终运行效果如下所示,可以通过Gitpod实时查看代码运行和结构

版权声明:
本文来源网络,所有图片文章版权属于原作者,如有侵权,联系删除。
本文网址:https://www.mushiming.com/mkjdt/16355.html